Monday, April 27, 2009

A Bit on Eggs

It feels like a nice time to think on eggs. I don't know if it's the spring weather or just what, but if seems like the time of year to start cooking with lots of eggs. With picnics and barbecues coming, we always need to be ready to fire some deviled eggs. Brunches and light lunches definitely call for quiches and frittatas. Or how about light dinners of salad and souffle? I've got my own special event coming up in a couple of weeks, I will tell you all about it when the time comes, and I wanted to do a little investigating on the subject. I found some interesting information and I've shared it below.

While we're on the topic of eggs, I want to share a little story. I was at Fred Meyer this morning shopping around and while I was in the health food section picking up some eggs and creme, a little old lady came up to me. "Do you know where the organic eggs are?", she said asked quietly, her wrinkly eyes looking at me very directly. I happily helped her, I love helping the elderly folks. I just get tickled doing my best to help them get their needs. I feel honorable in that moment. Or something. Anyway, I pointed her to the eggs and told her which ones said they were organic to which she quickly remarked, "Oh nowadays, just because they say something doesn't mean bullshit." I agreed. I wasn't sure if she was referring to the whole organic business of technicalities and wording and what is really what, or if she was just referring to the general shadiness of the times nowadays. Anyway, I scrambled to find her a dozen of the best eggs I could find. She smiled and we wished each other a good day. Eggs and old folks. Aren't they the best?


Grade AA is best for frying and poaching, but A is okay, too. Because the whites are more firm, grade AA or A eggs will have better shapes when you break them out. They won’t spread out as much in the pan when you fry them. There won’t be as much white that breaks off from the egg and forms "angel wings" in the water when you poach them. Grade B eggs would spread out a lot if they were fried and a lot of the white would float off into the water if they were poached.

Grade A is better for hard-cooking. Because the smallest air cells are in grade AA eggs, the membranes just inside the shells are very tight up against the shells. This makes it harder to peel off the shells without taking some of the whites along with the shells. Because the thinnest whites are in grade B eggs, the yolks sometimes move around inside the eggs. This can cause the yolks to be off center. Off-center yolks can make pretty funny looking hard-cooked egg slices or deviled eggs. Grade A shells will usually be easier to peel than grade AA and grade A yolks are more likely to be centered than grade B.

Any grade can be used for scrambled eggs, omelets, quiches and baked goods or any other recipe in which the shape of the egg isn’t important. Once you beat them up, all the different grades of eggs will work the same in a recipe. It doesn’t matter if their whites are thick or thin or their yolks are tall or flat. Grade B eggs don’t look as pretty as grade AA or A, but they have the same good nutrition. You won’t usually find grade B eggs in the stores. Some are used by bakeries or restaurants, but most are made into egg products.

No matter what grade, eggs need to be kept in the refrigerator whenever you’re not cooking or eating them. Refrigerating eggs keeps their quality high for a longer time. If you leave eggs out at room temperature, their quality will go down faster. When the quality goes down, the eggs’ air cells grow, their whites thin and their yolks flatten. Scientists say that a day a room temperature will cause an egg’s quality to go down as much as a whole week in the refrigerator.

Coconut Apricot Thumbprints

You've probably picked up on the fact that I've been on a bit of a thumbprint cookie kick. I can tell you I'm here to report the last story on them for awhile. Believe it or not, I think I've had my fix for a good while. But before I move on I just have to share one last recipe with you.


This version comes from my best friend Ina Garten. Oh, how I wish that last statement were actually true! Anyway, in true Ina style she found a way to make a classic and take it up an indulgent notch by rolling the cookies in and egg wash and sweetened coconut. They couldn't be any prettier.


COCONUT APRICOT THUMBPRINTS
adapted from the Barefoot Contessa

3/4 pound (3 sticks) unsalted butter, at room temperature
1 cup sugar
1 teaspoon pure vanilla extract
3 1/2 cups all-purpose flour
1/4 teaspoon kosher salt
1 egg beaten with 1 tablespoon water, for egg wash
7 ounces sweetened flaked coconut
Raspberry and/or apricot jam

In an electric mixer fitted with the paddle attachment, cream together the butter and sugar until they are just combined and then add the vanilla. Separately, sift together the flour and salt. With the mixer on low speed, add the flour mixture to the creamed butter and sugar. Mix until the dough starts to come together. Dump on a floured board and roll together into a flat disk. Wrap in plastic and chill for 30 minutes.

Roll the dough into 1 1/4-inch balls. (If you have a scale they should each weigh 1 ounce.) Dip each ball into the egg wash and then roll it in coconut. Place the balls on an ungreased cookie sheet and press a light indentation into the top of each with your finger. Drop 1/4 teaspoon of jam into each indentation. Bake for 20 to 25 minutes, until the coconut is a golden brown. Cool and serve.


Custard-filled Cornbread

You heard it right. Custard-filled cornbread. That just sounds way too over-the-top good, right? I mean I adore cornbread, always have, and I love all things creamy. When I made the soup below I decided to serve it with cornbread and having just finished A Homemade Life, where Molly Wizenberg wrote a story about maple syrup and how her husband loves to pour it all over custard-filled cornbread. I was sold.


Intrigued, I had to get online and find out more about this stuff. Sure enough. There it was. It was written about on little food sites here and there. How had I never heard about this stuff? I found a recipe much like Molly's only it also called for corn kernels and happened to come from Miss Martha Stewart.


I have to admit that it's quite fun to pour a cup of cream into the middle of the batter. Boy, does it feel naughty...


CUSTARD-FILLED CORNBREAD

3 Tb unsalted butter, melted
2 c. all-purpose flour
¾ c. yellow cornmeal
1 tsp baking powder
½ tsp baking soda
2 large eggs
¼ cup sugar
1 ¼ tsp salt
2 c. whole milk (2% also works)
1 Tb plus 1 ½ tsp. distilled white vinegar
1 c. fresh or thawed frozen corn kernels
1 c. heavy cream

Preheat oven to 350F. Butter a 9x2” round baking pan, and place in the oven to preheat. Whisk flour, cornmeal, baking powder, and baking soda in a medium bowl; set aside.

Whisk eggs and butter in a large bowl. Whisk in sugar, salt, milk and vinegar. Add flour mixture, and whisk until just smooth. Stir in corn kernels.

Transfer batter to heated pan. Pour cream into center of batter; do not stir. Bake until pale golden brown and set, about 50 minutes. Let cool on a wire rack for 15 minutes. Unmold (optional), and serve warm.


So here's my issue, I'm wondering if I should have cooked it longer? The cornbread itself was done and I really detest dry cornbread so I pulled it out. But the center of my bread is way gooier than most everyone else's I've seen. See....


I was kind of hoping it would look like the photo here over at Tasting Spoons. I think next time I won't use corn kernels and I will use fine ground cornmeal. I really loved the concept of this recipe. I will update you next time I make and see if it turns a bit better. If you decide to make it, I would also just try the recipe over at Tasting Spoons. I know I'm going to!

Saturday, April 18, 2009

Kale, White Bean & Sausage Soup

I love rustic meals like this one. I stumbled across this recipe about a year ago on Epicurious and made it right away. It's very easy and makes the perfect Sunday night supper. This soup is full of the good stuff: creamy white beans, tender carrots, salty rounds of sausage, and lots of wilted kale. It's pretty cheap to make and wonderfully satisfying!


Kale, White Bean & Sausage Soup

1 lb dried white beans such as Great Northern, cannellini

2 onions, coarsely chopped

2 tablespoons olive oil

4 garlic cloves, finely chopped

5 cups chicken broth
2 qt water

1 (3- by 2-inch) piece Parmigiano-Reggiano rind (optional)

2 teaspoons salt

1/2 teaspoon black pepper

1 bay leaf (not California)

1 teaspoon finely chopped fresh rosemary (or a a couple t. dry)

1 lb smoked sausage such as kielbasa, sliced crosswise (I used Italian)

8 carrots , 1/4 inch thick slices

1 lb kale (preferably lacinato), leaves coarsely chopped


Preparation Cover beans with water by 2 inches in a pot and bring to a boil. Remove from heat and let stand, uncovered, 1 hour.

Drain beans in a colander and rinse.
Cook onions in oil in an 8-quart pot over moderately low heat, stirring occasionally, until softened, 4 to 5 minutes.

Add garlic and cook, stirring, 1 minute.

Add beans, broth, 1 quart water, cheese rind, salt, pepper,

bay leaf, and rosemary and simmer, uncovered,

until beans are just tender, about 50 minutes or more.
While soup is simmering, brown sausage in batches

in a heavy skillet over moderate heat, turning,

then transfer to paper towels to drain.
Stir carrots into soup and simmer 5 minutes.

Stir in kale, sausage, and remaining quart water and simmer,

uncovered, stirring occasionally, until kale is tender, 12 to 15 minutes.

Season soup with salt and pepper.


I didn't add the cheese rind, instead I just sprinkled some ground Italian cheeses on top. I also think a splash of white wine vinegar is nice in this soup. It wakes up the flavors and gives it a nice tang. I also added a few very generous pinches of red pepper to our batch. This makes a good amount of soup and gets better with age so count on leftovers!


Enjoy!

Orangette's Banana Bread

I'm sad to report that I've just finished Molly Wizenburg's, A Homemade Life.  I read the book slowly, so I'd have a little bit more to savor every time I wanted it.  I loved it.  I really like the way it was setup, short little stories, two to four pages, and then a recipe.  And then another story, and a recipe.  Molly's writing is so personal, witty, and enchanting.  Each and every time I read the book, I went on a journey to the places we all really dream about.  It was an ethereal experience.  Many of you know I've been a huge follower of Orangette for years now and to get a book, something I can hold in my hands, has been big news!  


There are loads and loads of recipes I will make from this book.  The Butternut and Vanilla Bean Soup sounds lovely.  The Scones are being talked about with high regard.  Burg's Potato Salad sounds like a recipe right up my alley.  She also writes about a Vanilla Buttermilk Cake with Glazed Oranges.   That just sounds pretty.  But for some reason I started with her Banana Bread with Chocolate and Caramelized Ginger.  I have a soft spot for banana bread.  I once made what I thought was the perfect banana bread.  It was dense in all of the right ways, moist, oh-so-moist, rich from the addition of sour cream, and had the most lovely crack down the center after baking.  It also had chocolate chips inside and cinnamon sugar on top.  It was perfect.  And I only made it once because I lost the recipe.  You can't imagine how many times I've fantasized about finding that little piece of paper.


Before I go further to report on this recipe, I should preface it by saying I don't like ginger.  I don't.  I can take a bit of it in Asian food and that's about it.  A sprinkling of dried ginger here or there, I won't mind.  I like Gingerbread men?  It's just that big chunks of the stuff kind of make me sick.  For some reason, I threw caution to the wind and jumped into this recipe feet first. After eating this recipe, I still don't like ginger.  Even when it's dried and cute all dolled up in little squares with sugar dresses on.  It glistens.  It sparkles.  But, I still don't like it.


I wish I could say that's the only reason this banana bread won't replace the one I dream about. I really can't even stand to talk negatively about something that comes from Miss Molly.  I feel like I'm about to speak harsh words about the queen that everyone unanimously adores, including me!  I know Molly's recipes are good, fabulous even, this one's just not for me.  


Ginger business aside, I just didn't find the taste or texture very memorable.  I  guess I like my banana bread a little denser.  And moister.    


It's kind of funny because I doubled the recipe too.  I had lots of bananas and lots of zeal about making it.  So we really had our work cut out for us to finish it. 


They look nice, don't they?  They baked off beautifully.  They really did.  Twelve muffins and one gorgeous loaf.


You can see a little chocolate chip there below poking it's little head out.  I do fancy chocolate in banana bread.  Only the most uptight person wouldn't.


I couldn't resist dousing it with a little bit of my cinnamon sugar.  


Okay, here's the recipe.  I'm sure you wonder why I even blogged about something I didn't really care for.  Well, I just am.  I took pictures of it and ate it and I think a lot of people out there like it.  So, I think if it looks and sounds good to you then you should try your hand at it. It might just become your Perfect Banana Bread recipe.  I'm pretty sure it's right up there on Molly's list and she knows something good when she sees it.  She still has my devotion.   


BANANA BREAD WITH CHOCOLATE CHIPS AND CANDIED GINGER

Molly Wizenberg


6 tbsp butter melted

2 cup ap flour

3/4 cup sugar

3/4 tsp baking powder

1/2 tsp salt

3/4 cup semi sweet choc chips

1/3 cup chopped crystallized ginger

2 eggs beaten

3 bananas mashed up

1/4 cup yogurt

1 tsp vanilla


Oven 350F grease loaf pan.

Whisk flour, salt, baking powder, sugar.  Add chocolate chips and ginger.  In another bowl add mashed bananas, melted butter, yogurt, eggs, vanilla, whisk it all up.  Add this to flour bowl and stir to totally combine.  Scrape into loaf pan, smooth top, pop in oven for about 50 mins, and do the toothpick drill, you know, where it comes out clean.

Monday, April 13, 2009

Cannelés Honoré

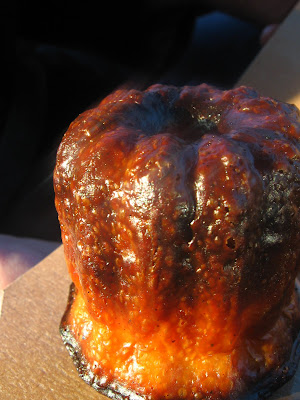
This whole story starts a long way back with the cannelés, which means fluted in French. The pictures below are also where it all started. A couple of long years ago I stumbled across these photos while food blog surfing. From the very moment I laid my eyes on it and read more about it, I was enthralled. I wanted one. Bad. Well it turns out that these antiquated little french pastries are quite hard to track down.


Cannelés Bordelais originate from the Gironde/Bordeaux region of France, it is said that nuns used to collect flour from big ships there and made these humble little pastries for the less fortunate. Using a crepe-like batter speckled with vanilla beans and citrus zest and very specific copper molds you end up with these special pastries. The outside is supposed to be crisped and caramelized while the interior remains wet and kind of spongey. Caramel, cake, and creamy custard-like things are some of my all-time favourite tastes and textures. It seemed I had found my perfect dessert concoction. Humidity causes their outsides to lose crunchiness quickly so it's wise to eat them right away. I've not made them yet because I'm holding out to collect about a dozen of the copper molds, I just can't bring myself to use the silicon liners you see around. I've read that as simple as the ingredients are, canelés can be tricky to perfect.


I've been in search of one of these for what feels like forever. I've called french bakeries in Seattle, done lots of Internet research looking for them, and even contemplated trying to order some from a little bakery in Walla Walla that appears to make them. My friend Ashley from the former Artisan Sweets which has now moved to a lovely new location, Not Without Salt, told me that she'd tried them before and also saw some in the freezer section of Trader Joe's but didn't know how they would be. Well, of course I ran out the next day to buy a package and try them out. It would be an understatement to say that I was incredibly disappointed. They were terrible. The outside resembled rubber exactly. I knew that canelés couldn't really be this way. Not with how much praise they get. Thankfully, a couple of weeks later, Ashley also sent me a link she'd seen about a bakery in Seattle who made them. Honoré Bakery was the next must-do on my list.


One weekend several weeks ago, I got very close to trying them out at Honoré, but much to my disappointment I arrived at the their storefront six minutes post closing. Once my heart sank a few notches, I accepted it, and understood that in order to get canelés, I would have to be to the bakery before 3 p.m., easy enough. And that's just what I did two weeks later.


Honoré is a cute french bakery tucked away on NW 70th St. in Ballard. If you blinked driving by you would miss it. Here are some photos I stole while visiting.


I thought these photos stamped on the front of their espresso machine were kind of charming.


The photo below is a stubborn one, it just won't rotate so you can view it properly. Savory pastries with onion, Gruyere, and thyme... I couldn't leave them out.


Poached pear frangipane...


This picture didn't turn out well, but it doesn't feel right leaving out at least some imagery of their adorable, pastel macarons. We tried a few: lavender, chocolate, strawberry, and passion fruit. This will make some people turn in their graves, but I think when it comes to macarons, I might like looking at them a great deal more than I like eating them... ?


And here is one the two canelés Ethan and I shared. The sad news is that when we bought them we were on our way to have lunch at a friends house and as to not spoil our appetites, we waited to have it until that evening. I was a little worried about this thinking they might not be as good hours later and I was right. The humidity had done it's thing and what was a crispy outer shell when I first bought them had softened a bit, they were still tasty and offered a true glimpse at what one would be like right out of the oven. That is the next mission.


Sunday, April 12, 2009

Joe's Truffled Shrimp Salad

To make Joe's shrimp salad sandwiches, you just need to go the store and get a really great loaf of bread, maybe sourdough or rosemary. Something that you will slice thickly and has a good, chewy crust. You will also want to select some ripe, red tomatoes and a very luscious and ready-to-go avocado. You will also want to pick up a pound roughly of precooked bay shrimp from your favourite seafood counter along with some fresh parsley and a bottle of white truffle oil.  If you don't have some good mayo in your fridge you will certainly need a jar of that as well.  


Finely chop the parsley, about a quarter cup I'd say.  Tumble the little shrimp into a medium bowl, spoon a few dollops of mayonnaise and a good drizzle of truffle oil over them and toss gently.  Season with salt, pepper, and chopped parsley.  Toss again gently.


Cut thick slices from the loaf of bread and lightly toast, place several heaping spoonfuls of shrimp salad down on one side, and layer tomato, avocado, and lettuce if you have it on top.  Sprinkle with salt and pepper and enjoy.


It's fresh, satisfying, and something you don't have everyday.  I'll always think of Joe's when I make this lunch.


A Sunday with Seattle

If you're starting to think that all I ever do when I go down to Seattle is buy cupcakes then you're probably right.  One of these times I will go and I will not buy any cupcakes.  We went down to Seattle a couple weeks ago to have lunch with a childhood friend of Ethan's.  I thought it fitting to bring cupcakes along for dessert and this gave me the perfect reason to sample the esteemed Salted Caramel Cupcake from Cupcake Royale that I've been reading about here and there.  I just visited there site and saw that this month's featured flavour is Honey Peanut Brittle, so clever.  I wish the cupcake shop, Katie's, here in Bellingham would get creative like that.  I don't think I've weighed in with my two cents on the place so here I'll go.  I don't have any pictures of the cakes, frankly, they aren't quite cute enough to go gaga over and photograph. I think it's wonderful that we finally have a cupcake shoppe here in town and wish I'd have been able to do it myself!  In my humble opinion, I think the style of the shoppe could be a bit more gender-neutral and stylish, I also think some of the recipes could really use a face lift.  The vanilla on vanilla in particular is lacking the richness and wonderful, fine crumb that I think a classic vanilla cupcake should have.  Katie's is kind of dry and cottony.  I hope the store does well though, I've always thought that Bellingham could support a cupcake shoppe.  That's all I'm going to say about that.  


We tested out Cupcake Royale a couple of years ago and were not at all impressed.  We found the cakes to be dry and not a bit as good as homemade ones.  So I crossed the business off my list of to-do's and planned on never returning.  Well some sort of fate took me back and I can honestly say that they were much better this last time.  I talked with some of the employees and they stated that recipes had changed, etc.  I picked two of the Salted Caramel to ensure I got a sample, and then picked carrot cake and Irish Whiskey and Maple.  We all agreed that they were very tasty indeed.  You aren't going to believe me when I say this, but, I think I've had my fill of cupcakes for at least a couple of months.  Just don't hold me to it, okay?


Ethan's friend Joe was gracious enough to invite us over to his lovely home not far from the shores of Lake Washington.  It was a bright and airy home with lots of art and Seattle flair.  He was playing some fabulous and cheerful music when we arrived and quickly offered us a little fruit spritzer beverage concoction.  I was loving it.  I'm deeply enthralled in aesthetics and take in so many visuals when I go someplace new, especially if it is beautiful.  And in a very Northwest and Seattle-specific way, Joe's bachelor pad was beautiful.  I wish I had more pictures for you, I especially wish I had taken a couple shots of the table spread he had laid out for our lunch. Why is it that food always tastes so much better when you are dining at someone else's home?  He had a simple array of breads, meats, shrimp salad, cheeses, avocados, cherry tomatoes, and other accoutrements casually placed about the table.  It was just what we needed after a frustrating couple hours of traffic.  What really jumped out at me was the shrimp salad.  Out of curiosity I had to try it.  He took little precooked bay shrimp, you know the little tiny pink ones, and just tossed them with a generous amount of mayonnaise and truffle oil.  I don't typically buy or eat those little shrimp, but in this salad and on bread with lots of lettuce and avocado, they were just scrumptious.  I'll post about my go at it next.  I had to include a picture I took in his back garden area.  Joe has this amazing tree back there with huge magenta flowers all over it and the ground.  Lovely!


After we parted with Joe we decided to take a drive through the neighborhood around his place and fell in love with lots and lots of beautiful homes.  I can't believe that in all my years of living here I've never seen those areas of Seattle.  You feel like you're in the most beautiful city in the world and tucked away in those tree-lined streets and quiet blocks you don't even feel like you share it with anyone. Mission: get rich and move to the shores of Lake Washington. 


After a couple more hours we ended the night in our car with burgers from Dick's and jazz on public radio.  I love those kind of days.


Saturday, April 11, 2009

Pass the Mayo

It's getting to be asparagus time.  I think asparagus is one those great vegetables.  With it's tall, usually slim shape and bright green color it couldn't be more elegant.  One of my favorite ways to make asparagus is to roast or lightly saute it and lay it over perfectly-scrambled eggs studded with red bell peppers, tomatoes, and chives. Add a generous amount of shaved Parmesan and roughly chopped chives and you have what I call my Sunday Eggs.  

My mom used to make an asparagus creme soup that has always remained in the recesses of my food mind.  I think it's just lovely added to tarts or quiche.  The way I'm going to talk about it today however isn't quite so posh.  But honestly, it's the first way I remember eating asparagus and for me that makes it classic. Mayonnaise haters: you better grab your weapons.


This all starts with being a kid.  For a long time growing up I don't think our weekday dinners were so hot.  They were quick and simple, sometimes from a box.  I think home finances in the early years probably had a lot to do with this because when it came time for the weekend, my Mom would pull out her good stuff.   She's always been the best hostess.  I don't remember a lot of our weekday dinners, but I do recall plenty of Kraft Macaroni and Cheese always served with peas and cottage cheese,  toast with an array toppings the most unusual being egg gravy, and asparagus with mayonnaise.  My mom grew up in asparagus fields so I never even thought to question whether this was a good idea or not.  My family were asparagus people, and if they ate theirs with mayonnaise then that was just what I was going to do too.  

The thing is, you might already be thinking how this weird or disgusting this sounds.  However, I think I need to paint a more detailed picture for you.  Again, going back to the 'early years', I don't think my Mom had the cooking skills she does now.  She had a little family to feed and that's what she did.  She didn't have loads of gourmet cookbooks lying around the way she does now.   Back then, her idea of cooking asparagus meant throwing it in a pan of boiling water and killing it slowly until it turned terribly limp, stringy, and the ugliest shade of grey with a hint of olive green.  Perhaps the mayonnaise is what made the asparagus edible at all.  In those days I didn't even know that asparagus could be cooked and end up crisp, tender, and bright green.  I just didn't know.  The funny thing is, I liked it that way.  Back then I did anyway.  

I can't believe it's been over a decade since I've made asparagus and served it with mayo.  To tell the truth, I'd forgotten all about it until recently.  So one night last week, I went all the way back...

You could serve this alongside roast chicken or a nice piece of salmon.  I have to admit, when I made it, it didn't do for what it did back then.  It was good enough though and I just wanted to tell you about it.


ASPARAGUS WITH MAYONNAISE


as much asparagus as you need to feed the ones you love
mayonnaise, preferably Best Foods if you want to be traditional here
good salt and fresh black pepper
olive oil

Wash and snap the asparagus to get it pan-ready.  Fill and appropriately-sized serving dish with mayonnaise.  Heat a skillet over medium high heat, once hot, drizzle a tablespoon or so of olive oil in and throw asparagus into pan.  Shake the pan often and vigorously to coat the sticks in the oil and cook them quickly and evenly.  They might take on a tad bit of color.  They should be shiny and bright green.  Cook them until they are the consistency that you prefer, al dente, tender, or dead and limp.  Quickly sprinkle on salt and pepper and serve with a nice spoonful of mayo.  


Friday, April 10, 2009

Vanilla Bean Simple Syrup

It doesn't get more simple than simple syrup.  Because of a beverage recipe I have been toying with, I was prompted to make a vanilla simple syrup.  In the photo below, you will see two glass containers.  The tall one is a gift from my mother, an antique medicine jar holding magical homemade vanilla and the other is a squatty lil' pot of my simple syrup.

You would be wise to make some of this up yourself because it lends itself wonderfully to all sorts of culinary creations.  It's a no-brainer to add it to your morning tea or coffee brew.  You can also make a mean jar of homemade lemonade with this stuff, vanilla bean and all.  I made it for my wedding and it was heavenly.  Vanilla Bean Lemonade.  Does it get much better than that?  I'm a major homemade lemonade fan, it might just be my all-time favorite beverage. Well then, you could always just drizzle some of this over a fruit and that would be delightful. 

This recipe makes quite a bit and would also make a most wonderful gift...  


VANILLA BEAN SIMPLE SYRUP


2       C.   Water
2.5    C.   Sugar
1       Lg.  Vanilla bean, split, seeds carefully spooned out
1       T.    good vanilla extract  (optional)


Bring water, sugar, and vanilla seeds, pod, and extract to a simmer and allow sugar to dissolve, bring to boil and let fuse together this way for a few minutes.  Let cool before pouring into jars.  

Wednesday, April 08, 2009

Cookielettes

There are two names that get thrown around a lot in my kitchen: Ina and Martha. These two ladies make the kind of food that I like to cook and eat. Homey food. Food that you crave and food that always sounds good. They are my go-to gals for sure. I've been a bit taken by tea cookies lately. They are the perfect accompaniment to a cup of coffee or tea. They are petite and as cute as can be. Tea cookies are big enough to satisfy a pesky sweet tooth yet small enough to feel okay about. I love how tea and icebox cookies can be pulled from the freezer at a moments notice. I have a little way that I love to eat tea cookies.  I select about four of them and place them about on a cute little dish.  If I'm feeling like it, I'll sprinkle a bit of powdered sugar over them.  Then I make a good cup of coffee and I take a few sips of hot beverage, then take a little nibble of the dry cookie.  Before the cookie is entirely out of my mouth, I take another sip of my coffee.  It washes the cookie down perfectly.  This may sound a little weird, but people, it works!  


I recently made mini thumbprints for tea cookies and in the next post will introduce you to a new thumbprint cookie recipe.  But for now, I shall pass along a precious recipe for Earl Grey Tea Cookies.  It comes from Miss Martha and makes quite a pretty little round.  I was initially a bit disappointed with the fact that the Earl Grey doesn't come through quite as strongly as I was hoping, but with the orange zest, it's really a nice flavor.  I hope you bake yourself some tea cookies to enjoy!  They really are a classic treat that should be enjoyed regularly with a ritual all your own!


EARL GREY TEA COOKIES
Martha Stewart Cookies
2     C.  AP flour
2     T.  Earl Grey tea leaves, finely ground
1/2  t.  course salt
1      C.  unsalted butter, room temp.
1/2  C.  confectioner's sugar
1      T.  orange zest, finely grated

Whisk flour, tea, and salt in a bowl.
Paddle butter, sugar, and orange zest in a stand mixer, medium speed until pale and fluffy.  3-5 minutes.  Reduce speed to low and add flour until just combined.
Divide into two logs and roll to 1 1/4 inch in diameter.  Chill for at least an hour or freeze.
When ready to bake, slice cookies into 1/4 inch slices and bake at 350 for 13-15 minutes or until golden around the edges.  Serve sprinkled with confectioner's sugar.  You must have these with coffee or tea!  Enjoy!

The Last Supper

As I said in the last post, our gourmet group, Around the Table, recently had another dinner themed, The Last Supper.  We each brought a dish that is one of our top favourites.  Sounds like a tasty idea, right?  Miss Mallory hosted and in the spirit of Earth Day, which was the day we had the event, she decorated with earthiness in mind.  She always does such a fabulous job of hosting a soiree.  This particular party was no different.  We started the night with natural outdoor light and when the sun went down we ate to candlelight only.  It was very special and really turned out to be a nice evening.  Let's get to the food...


I had first course and as I just wrote about, I made Crab Cakes with Coconut Sauce and Mango-Red Pepper Salsa.  The recipe can be found in the last post.  I thought it turned out well.  The crab cakes were fairly simple, the sauce was sweet and tangy from the pineapple juice but was balanced out by the ginger and garlic.  The salsa was fun to prepare and added a lot of color and crunch to the plate.  I've decided that I will be using crab more often since I found this product for only $12.00 a pound! 


Ashley made a dish that her family is famous for.  Potato Pancakes.  Don't confuse them with Latkes, these were just as they sound.  Potato with pancake.  The recipe I don't have for you, but I know that it had flour, baking powder, eggs, potatoes, and onions.  Initially I found the texture a little odd, but after a few bites the chewy, denseness became something I liked.  She served them in the classic way, with a healthy dollop of sour cream. 


One of our new ladies, Alexis, made a heavenly vegetable dish.  She prepared Roasted Beets and Caramelized Onions with Feta only she used chevre in place of the feta.  She also sprinkled the whole ensemble with pignoli nuts.  I LOVED this dish.  The beets were roasted perfectly and the red ciopollini onions added a lovely purple color and amazing flavor.  This dish is amazing and you should definitely think about adding it to your repertoire.  It's lovely served at room temperature, which makes it a great choice for entertaining.


Mallory had the entree and opted for the classic comfort food, Mac & Cheese.  She dolled her version up with butternut squash puree (which added a nice sweetness), Flagship cheddar, Brie, and of course, Bechamel sauce.  She chose a wonderful organic pasta, Conchiglie. You can find it in little brown bags at your local natural food shop.  The brand is Montebello.  It's like macaroni on steroids and it is so delicious!  I could hardly keep myself from going back for more and more, the texture of the pasta was so addictive!  It has a really large cavity in the center which allows for lots of sauce absorption.  Mallory is known for her love of caramelized onions and she didn't miss a beat by putting some on the top of her dish.  I loved it!

 
Laura is another new addition to the group, and speaking of the local co-op, she happens to be a baker at the new location here in town.  Laura got dessert obviously and spoiled us with the lovely Napoleon you see below.  She used Puff Pastry for the bready rounds, made vanilla bean cheese cake layers, and dipped the puff pastry in a wonderful hazelnut chocolate.  She served it with a scoop of coconut milk ice cream.  I love all the things she used in this dessert so to put them all together is fine by me!  I think it was quietly begging for a sauce, but it was fine without.  I think she was very creative and really put some thought into her dish.  I love how these dinners bring out so many personalities and cooking styles.  It was truly a delightful finish to the end of a very enjoyable dinner party!


Thanks again to the wonderful hostess, Mallory, and thank you for sharing your photos with me again!  I really appreciate it!

Our next get together is in May and we will be having a classic spring brunch.  I've got fruit and a baked item.  Scones...  I won't wait so long to fill you in on the next chapter!