Saturday, June 26, 2010

Cultured Vegetables

Alright. Let's get in an afternoon quickie, shall we? My last two posts were pretty long-winded! I'm about to do something I rarely do on this site, tell you about something healthy! You may have noticed that I gravitate to comfort foods and foods that aren't so good for you! Truthfully, with all of this love for foods that don't always love me I've had to pause and evaluate my health. Look into the business of balance. The culinary school I went to was big into the idea of acid and alkaline balancing. Since then, I've always believed in its validity but never made it a priority in my diet or in my stomach! After reading a book called the Body Ecology Diet, I have become aware of the value of cultured vegetables. They do wonders in aiding with the digestion of protein and help to create a overall balance with your internal flora. The standard American diet isn't dotted with many bitter foods. The taste is not something we gravitate to and is not usually present in our favorite foods. Other cultures, especially Asian, are much better in the department of consuming alkalizing, bitter, and fermented foods. Yogurt is a good start but there is really so much more you can do! Kefir, raw apple cider vinegar, and cultured vegetables!


I have to be honest. These are funky. Think sauerkraut only quite a bit more funky. I think they are most palatable tossed into a green salad. You hardly notice them there and are in fact a nice addition in flavor to a basic green salad. Throw some avocado, croutons, or anything else delicious into the salad and then you really don't even notice their presence. The photo of above is day one of the process. They don't look quite that beautiful on day four. Here's how make them...

Basically, you just need to buy a good amount of organic vegetables. I used red and green cabbage, yellow beets, carrots, kale, and a bit of arame. You wash and put all of the veggies through the shredder on your food processor. It's a very healthy process, you will feel so wonderful going through all of these veggies and creating a colorful shredded pile. Then, you take a few handfuls of the mixture and put it into a blender with enough purified water to make a liquidy brine. You can also add dill, caraway , mustard, or cumin seeds or whatever else to flavor if you'd like. Then you just pack the mixture into a large glass and pour the brine over the top. You want to leave room in the top for the expansion that will take place through out the process. Then you roll up some cabbage leaves and stuff them on the very top, seal it up, and leave it out on your counter for 4-6 days at room temperature, make sure your home is 70 degrees or higher. I had to take mine to work where I know it is always quite warm. You will start to notice little changes day by day, bubbles form, the liquid moves to different areas, the color changes, the mixture grows. When you open the jar at the end a large popping sound will occur. You can salt the mixture if you'd like afterwards. It keeps in the refrigerator for months. Cultured vegetables take some getting used to! But eating them is something you can feel really good and proactive about! Your stomach will thank you!

Monday, June 21, 2010

BBQ Beer Can Chicken & Carrots Vichy

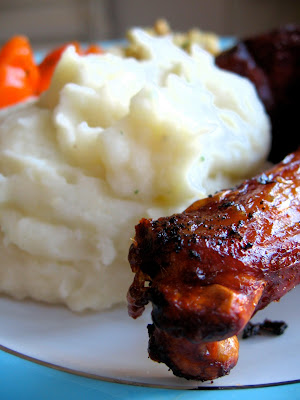
BBQ Beer Can Chicken. You can see it there below. My sister made me painfully aware of the fact that she does not find the picture below the least bit appetizing... I suppose I can see her point, it's just that I really wanted to show you how brilliant the beer can really is, and I wanted you to see it! Do you see it peeking out down there? You can also see the tasty and very simple rub I massaged into the little baby. I've said it here before, I'm not a huge fan of chicken. If it's not seasoned quite heavily or just the palette for say curry or tacos, I'm usually just not that into it. I really like don't how 'fleshy' it can taste. I haven't completely lost all my vegan repulsions. Though a juicy, rare steak doesn't give me one problem anymore. I really can't make sense of it. But, I will end there by saying this chicken is amazing. And I like it. We've made it three times in the last month now! And it couldn't be easier or better in my opinion. And then there are the Carrots Vichy...


There is the start of them below. Carrots à la Vichy are basically thinly-sliced carrots authentically cooked in sparkling Vichy water, which is apparently mineral water that comes from the springs surrounding Vichy, Frances well-known spa city. Add some butter and sugar, then simmer it all down gently until the water reduces and the carrots are oh-so-perfectly glazed and without any added color. Sprinkle with parsley and then voila as the French would say. I stumbled across this dish at my new job surprisingly. I didn't use Vichy water of course, that would really call for some serious ooh-la-la but I did use San Pellegrino and I think my carrots were quite happy in it.


Okay, back to the chicken. As I just wrote, this beautiful grilled chicken couldn't be any easier. Simply choose the right chicken, you know, there is always the right one. Mine always makes itself known to me. I usually glance down in the refrigerated case and it's usually the first or second one my eyes land on and return to after a quick scanning look over. I pick it up, feel it, meet it. That's usually the one. Sometimes, you get lucky and the wrapping is clear so you can make sure there aren't any gross and unsightly big red marks or weird discolorations. For a girl who isn't always so crazy for chicken, my birds have to be gorgeous if you know what I mean.


I hope you had a nap or snack recently, I'm really yanking you around in different directions here. Chicken, carrots, chicken, back to carrots... Stay with me. So the carrots, basically, thinly slice about four cups of carrots. Barely cover with water, sparkling is ideal if you have it, and half a teaspoon of salt and simmer until al dente. Drain. Heat one-quarter of a cup of butter and two tablespoons sugar in a pan over medium heat until melted and mixed, then toss the carrots gently in the pan until coated and cooked through. Additionally, season with salt and white pepper to taste and garnish with minced fresh parsley. These are kind of like candy. And so, so good straight off the heat. Be ready to pop the little glazed, butter slices like caramel corn. They're that good.


Okay, back to the chicken. So, now that you've selected the right bird and brought it home. Get it out of the fridge. Grab a twelve ounce can of beer and drink about half of it. Fire up your barbie while you're at it. You need nice hot heat, mound the coals on one side of your grill by the way. You will place the chicken near the coals, but not directly on top of them. Rinse your chicken with cool water and pat completely dry with good paper towels. I'm a fan of white Viva. Set the chicken on top of the beer can, it will stand up nicely for you. Then, make a rub. If you already have a purchased one that's fine, we make our own mix with about two tablespoons of salt, two tablespoons of paprika, two tablespoons of brown sugar, and a good pinch or two of cayenne pepper. Some granulated garlic would be great in there as well. Mix it up. Then simply oil the outside of the chicken with a good amount of vegetable oil. Massage it around thoroughly and then sprinkle and rub on seasonings. That's it. It takes about ten minutes from start to finish. As I mentioned, place your chicken on the other side of the grill away from the coals, we put the breast side towards the coals. Cover and for a 4 pound chicken, it takes about a hour and fifteen minutes. All three times we've made this the chicken is always so juicy it almost seems wrong. It gets this great color and is much a like a rotisserie. Flavorful, tender, juicy, dare I even say succulent? You'll know it's ready when a knife inserted into the thigh produces clear juices. The thigh will also pull right out...


We got crazy and had a Thanksgiving in June. We had the chicken and carrots with buttermilk-mashed potatoes and Stovetop Stuffing. The stuffing is a bit embarrassing but it was our last plastic bag of the stuff. When we lived in our old apartment near the University, students would move out and live very miscellaneous boxes of things in the hallways or out in the front lawn. One day I came home and saw a large box of food items sitting at the base of the first flight stairs, tan cardboard box sitting on dusty hardwood floor, seemed innocent. I scored some good canned olives and for some reason grabbed a few bags of stuffing. For those poor, ramen noodle type meals, maybe? It isn't bad. I kind of like it's basic, gooey goodness. If only it didn't have hydrogenated oil...


So there you have it, BBQ Beer Can Chicken and Carrots à la Vichy. And, my thoughts on Stovetop Stuffing. My husband and I actually like this chicken so much we are considering making it on Real Thanksgiving as opposed to fussing with a turkey that somehow always gives me a headache. It's really, really good poultry. And that says a lot coming from me! Now that it's officially summer, well, almost, it's really the perfect time to start grilling. You could also serve this with that Barefoot Contessa salad I told you about! That and some lightly sauteed asparagus, a glass of crisp Pinot Grigio... Voila! Happy, happy summer, friends!


Friday, June 18, 2010

Crack Slaw

It seems a little crack-like that I'm sitting here at midnight in a quiet, quiet house writing to you about this unbelievably delightful dish that is Crack Slaw. I've just come over the mountains and through the woods to my Mother's home, it's my Dad's too, he's the reason we're really here this weekend. It's just that my Mother's home oozes her personality and touch so I think of it as mostly hers. The house is quiet tonight. All of it's inhabitants are peacefully sleeping. I peeked in on my sister and nephew Charlie in the other guest room, heavy sighs of deep breathing swirled through the dark black air. I just had to turn on the nearby restroom light so I could look for the tiny and very precious silhouette of my dear little Charles! What a treasure that little boy is. I should be sleeping too, but my husband and I only arrived here about an hour ago and while my late-night shower in a nicer bathroom than my usual (I have a thing for nice bathrooms) was terribly relaxing I'm just not ready to turn in. Outside, it's quite enchanting as well, there is a light, rainy breeze. And it's the kind of early summer breeze where you can't tell if the air is more warm or more cool. It's a bit beguiling. So, it seems like the perfect opportunity to come and tell you about something I've been meaning to share with you for over a year. Not too mention that I'm a wee (possibly more than a wee) behind in blogging.


Coleslaw is one of those dishes that we've all experienced our whole lives but can sometimes be quite boring and under appreciated. It's often made poorly: way too much mayonnaise if it's the creamy variety, under seasoned, or just plain uninspired! It's one of those dishes you could just toss easily together with very little thought or care. But why would you? It's such a necessary fresh and crunchy component to so many foods. I completely adore it on top of a salty, snappy hot dog. How about nestled between a warm, buttery bun and lots of BBQ pulled pork? It's also just lovely beside fried chicken or other rich, flavorful meats. Ina made a slaw once on her show that was gorgeous, I've never forgotten it and I've never made it either. I will though. She used mainly the usual suspect ingredients but it seems like she added something very green, I don't know if they were collards or kale? But she shredded them in such a way that the stands were very long and rather unwieldy and vibrantly colored. This slaw is of the Asian-flare I know, I know. We've all had the cabbage-ramen noodle concoction in a sweet, balanced dressing. But this version is different. It's out-of-control. It's best within the first few minutes it's made and in those first few minutes I guarantee that you cannot even begin to shovel it in fast enough. It's perfection for the mouth. No joke. You'll see. I'm not going to rattle on about it any further. I just really, really suggest you make it. Soon.


I have only a couple of things to stress about this recipe. The first is, you HAVE to let the nut mixture cool completely before adding it to the cabbage. Otherwise you can imagine what will happen, it will quickly heat and wilt the cabbage and that will totally take away from the crack effect. The other thing is that you really do have to eat this right away. It's best when the cabbage and noodles and everything else is super, super crunchy! I stumbled across the recipe at East Village Kitchen.


Crack Slaw
1 14 oz. bag of coleslaw mix
5 scallions, sliced on the diagonal
3 T. butter
2 T. sesame seeds
1 C. sliced almonds
1 package ramen noodles, crushed, don't use seasoning packet
Dressing:
1/2 C. vegetable oil (I love Wesson's)
1/4 C. sugar, or less to taste
2 T. soy sauce

Combine the coleslaw mix and scallions. Over medium heat, melt the butter. Add noodles, sesame seeds, and almonds. Stir often and heat until mixture is light and golden brown. Remove and cool completely. Stir up dressing ingredients and then combine with cooled nut mixture and vegetables. Stir quickly, serve up quickly, and eat quickly! Your fellow diners will adore it and it will become part of your recipe world!

~

Enjoy it, let me know if you love it as much as I do! I see a Rihanna-covered Elle lying on the carpet nearby, might have to thumb through it and then it's finally to bed for me!

Sunday, June 06, 2010

Peonies and Sour Cream Coffee Cake

I kind of have a love affair with this cake and these moments. First of all, cake. I love cake. I love cakes that are light and bright, angel foods blanketed in strawberries and vanilla bean whipped cream. I love cakes that are fruity, apple spice or pumpkin with cream cheese icing. I love classic vanilla with butter cream. I love dense, rich chocolate layer cakes with their deep, dark sophistication. A grand, tall coconut layer cake, what could be better? Vegetable... I crave a piece of cold, moist carrot cake with pineapple and no nuts or raisins. And morning or afternoon coffee cake is no exception.


I also adore peonies. They are my favorite flower and these pink beauties simply fill my soul with sweet enchantment. It pains me that you can only find them for a mere few weeks a year. I could be surrounded by them everyday. I don't believe it would be possible to fill my home with too many of them. I can just see it now.


Don't you want to dive head first into this round pool of rhubarb, vanilla, and cinnamon?


Although Ina didn't say to add fruit to this cake, I just couldn't help myself. I wondered what would happen if I thinly sliced up some deserving rhubarb from my sister's garden, dusted it with plenty of snowy sugar, and gingerly laid it down into the center of this cake. I also pondered whether or not to pour in the juice that formed in bottom of the rhubarb bowl, I did. This was not a mistake!


As you can see, this cake is very, very moist and tender. It starts with a solid, thick batter loaded with lots of sour cream and cake flour. It then gets layered between three rounds of buttery, brown sugar crumbs. Add fruit to the middle of leave it out. Bake it for an hour, let it cool, then drizzle it with just the right amount of maple syrup glaze. Perfumed by cinnamon and vanilla? Sign me up.


Be still my heart. If only every plate of food could be surrounded by gorgeous pink peonies. Or white ones. Or salmon toned. Though I've only seen salmon peonies online, I will find them for real. You can see the gooey, rhubarb filling practically tumbling out of this cake!


While we are nearing the end of this story, there are a few more images to take in. Told ya I would be adding a third installment to my Barefoot Contessa series here! I read one review of this cake where a viewer accused Ina of taking this recipe right from a first edition copy of the red and white checkered Betty Crocker cookbook. Of course I wouldn't dare investigate that one. I'm leaving all the glory to Ina.


I think this cake would be delicious and delightful filled with blackberries, nectarines, pears, or cherries. Just chop up about two cups or so of fruit, sweeten if necessary, and drop into the second layer of streusel filling. Citrus zests would also be nice mixed into the fruit of course, lime with blackberries, lemon with cherries, orange with rhubarb, etc. While reading the recipe reviews it was very apparent that most people recommended doubling the crumb recipe which I did. I also left out the walnuts it called for. You could add them or pecans if you wish?


Sour Cream Coffee Cake
Barefoot Contessa
serves 8-12

Cake:
12 T. butter, unsalted, room temperature
1.5 C. granulated sugar
3 Lg. eggs, room temperature
1.5 tsp. vanilla
1 1/4 C. Sour Cream, room temperature
2 T. warm water (my addition)
2.5 C. Cake Flour
2 tsp. Baking Powder
1/2 tsp. Baking Soda
1/2 tsp. Salt

Streusel:
1/2 C. Brown Sugar
1 C. AP Flour
3 tsp. Cinnamon (or less if you're not a huge fan)
1/2 tsp. Salt
6 T. butter, cubed, cold
1.5 C. walnuts, chopped, optional

(1.5 - 3 C. Fresh fruit, sliced, optional)

Glaze:
1/2 C. Confectioner's Sugar
2 T. Real Maple Syrup


For the cake, grease and flour or sugar a 10' tube pan. The type you would use to make an angel food cake. You also want the pan to be aluminum, light in color, none of that dark, non-stick stuff! I also lined the bottom with wax paper (out of parchment) to ensure the beauty came out easily. Preheat the oven to 350. If your oven runs hot like mine, go down to 335. Nothing worse than over-baked, dry cake right?
Make up the streusel first so it is all ready once you've finished the batter and are ready to assemble the cake. Also prep your fruit if you are using... set both aside.
Cream together the sugar and butter until fluffy, about five minutes on medium with paddle attachment. Sift or whisk together the dry ingredients and reserve. Once butter and sugar is ready, slowly add eggs one at a time until each is incorporated. Be sure to scrape down the bowl now and then. Then add the vanilla, warm water, and sour cream and mix until smooth. Then add the flour mixture and mix on low or stir setting until JUST incorporated. Remove from mixer base and carefully use a spatula to make sure all ingredients are mixed up from the bottom of the bowl.
Place 1/3 or just under of the streusel on the bottom of the pan. Then spoon in half of the batter. It's very thick, don't be alarmed. It will still rise and bake beautifully. Then add your fruit if using, then add just over a third of the streusel. Add the rest of the batter and smooth around evenly. Then add rest of streusel filling. Bake about 1 hr, check for doneness. Let cool for 10-15 minutes in pan and carefully remove cake and set on serving dish.
Mix together the maple syrup and confectioner's sugar and drizzle in whatever artistic style you desire on top the cake. Let cool completely before covering with cake dome or lid. Then just marvel at your work and beauty of the cake. Which you will! And then dive into that pool, people! : )


A couple dozen crumbs remind us of what was.